
Write-up: User-After-Free by MalwareTech
This time I decided to attempt something different from usual: user-after-free is a challenge based on heap exploitation created by MalwareTech. After all, knowing a bit of binary exploitation is useful for malware analysis.
Overview of the challenge
The vulnerable 32-bit executable is a simple server that registers clients and lets them broadcast messages. It accepts the following commands:
- SETNAME: set the name of the current client
- GETNAME: get the name of the current client
- SENDMSG: broadcast a message to all clients
- ISADMIN: returns a boolean indicating if the current client is an admin
- GETFLAG: get the first flag (only available to admins)
At startup, the server registers an admin client, while all new clients are created as non-admin. A maximum of 64 clients can be connected at the same time.
The main class: ChatClient
The class representing a connected client contains 5 attributes:
- Connected socket
- Client ID
- Admin flag
- Size of name
- Pointer to name (stored in the heap)
Each instance of ChatClient in memory has a reference to the class virtual table followed with these attributes, so its structure looks like this:
struct ChatClient {
    VOID** Vtable;      // 0x0
    DWORD  Socket;      // 0x4
    DWORD  ClientId;    // 0x8
    DWORD  IsAdmin;     // 0xc
    DWORD  NameSize;    // 0x10
    CHAR*  ClientName;  // 0x14
}
The total size is 0x18 (24) bytes.
To find the vulnerability a good starting point is where we provide some input, specifically the two methods ChatClient::SetName and ChatClient::SendMsg.
Let us take a look at the first one. It receives two parameters, a pointer to the new name and its size, plus the object itself in ecx (__this calling convention). If ClientName is not NULL and NameSize is different from the new size the old buffer is freed. A call to isValidUserLength makes sure that the new size is at most 0x40 bytes. If the old buffer was freed a new one is allocated and the new name is written in it, otherwise the new name overwrites the old one inside the same buffer.
What happens if the size of the new name is different from the previous and it is greater than 0x40? The old buffer is freed, but isValidUserLength returns FALSE, therefore ChatClient::SetName exits directly after sending an error message to the client. In this state ClientName still points to the now-free block and NameSize has still the same old value. If now we use the GETNAME command we read some free memory. If instead, we use SETNAME with a name that has the same size as the old NameSize, we write in that free memory. We have found our use-after-free vulnerability.
Low Fragmentation Heap
To turn the vulnerability into an exploit we need to know how the OS manages the heap. Starting from Windows 7, Microsoft added an optimization mechanism called Low Fragmentation Heap (LFH), which is used for low-size allocations (up to 0x4000 bytes). The LFH is described in great detail in this research.
TLDR: in the LFH, a bucket is an 8-byte aligned size of a heap chunk; for each bucket, there is a contiguous region of memory in which a set of chunks of that specific size is pre-allocated. The idea is that, since low-size chunks are frequently allocated and freed, instead of performing the full allocation and freeing each time, the system keeps a pool of chunks ready to be used. Each chunk in the LFH is preceded by an 8-byte header. For this writeup the only important one is the last byte: if it is 0x80 it means the corresponding chunk is free.
In Windows 7, the chunks are selected in-memory order for each allocation. When a chunk is freed it is inserted at the beginning of the free list. As long as there are chunks in the free list, those are selected for the next allocations.
The LFH handles our 0x18-byte ChatClient objects.
From bug to exploit
One of the classic ways to exploit a UAF is to force an allocation in the area we can modify. In this case, we would like to allocate a new ChatClient object in the freed name buffer of a previous ChatClient. Since ChatClient objects are allocated in the 0x18-byte bucket of the LFH, we must have the name buffer in the same bucket, meaning that the first ChatClient must have a name of 0x18 bytes. The exploit works as follows:
- Create the first ChatClient (controller) - 0x18-byte ClientName
- SETNAME for the controller > 0x40 byte
- Create the second ChatClient (puppet)
It is important to note that between step 2 and step 3 there are no allocations of 0x18 bytes, so the chunk that is selected to host the puppet is the one that is pointed by the controller’s ClientName. At this point, by calling SETNAME for the controller with strings of 0x18 bytes we overwrite the data of the puppet.
Arbitrary read
Before we dive into the flag hunt, let us see how to obtain the arbitrary read primitive, which will be useful later on. Since we have full control of the puppet we can overwrite its NameSize and ClientName attributes. If we want to read X bytes at address Y, we simply craft the new puppet with NameSize=X and ClientName=Y and then execute a GETNAME for the puppet. The only limitation is that GETNAME can return at most 1012 bytes.
Note: from here on, when not specified otherwise, “read Y bytes at address X” means via the arbitrary read primitive.
Flags
Flag 1
To get Flag 1 we must call GETFLAG as admin. We just overwrite the puppet with its original data, but with IsAdmin set to 1.
Flag 2
Flag 2 is the name of the admin client. Using GETNAME on the controller we read the data of the puppet. Among this data, there is the address of the ChatClient virtual table which is located at a Relative Virtual Address (RVA) of 0x581C from the beginning of the executable image. Therefore by subtracting 0x581C we get the address of the image (ExeImage). At an RVA of 0x7458 we have client_slots, an array of pointers to the currently connected ChatClient objects. The admin is the first entry in the array, so by reading the first 4 bytes at ExeImage+0x7458 we get a pointer to it, and finally we get Flag 2 by reading its ClientName.
Flag 3
Flag 3 is returned by ChatClient::GetFlag2, but that function is not associated with any command we can send. The solution is to “trick” the server into calling ChatClient::GetFlag2 instead of one of the others by setting up a fake virtual table for the puppet. We can store the fake vtable in the legitimate ClientName buffer of the puppet.
- Read the real vtable (9 * 4 bytes)
- SETNAME for the puppet with the data of the real vtable, but putting the address of ChatClient::GetFlag2 in place of ChatClient::GetFlag (6th entry)
- GETNAME for the controller to read the puppet’s data, specifically its ClientName
- SETNAME for the controller with the puppet’s original data, but with the pointer to the vtable replaced with puppet’s ClientName
- GETFLAG for the puppet
When the GETFLAG command is processed, the 6th entry of the fake vtable is executed, which is ChatClient::GetFlag2.
Code execution
With Flag 3 we saw how to get control of the execution via the vtable of the puppet, now we want to turn that into arbitrary shellcode execution.
For example, we can use a staged TCP reverse shell from Metasploit (total size of 341 bytes).
With DEP enabled, whatever we write in memory (either with SENAME or SENDMSG) has no execution permission. With ASLR enabled, we do not know where the stack and the heap are placed.
By reading the memory of the puppet we easily defeat the ASLR (see Flag 2). Since ClientName is limited to 0x40 bytes, to store the shellcode we either split it in multiple names or we use the SENDMSG. Our main challenge is to bypass DEP, which requires a ROP chain, so we have to find a way to manipulate the stack.
Smashing the stack
This is how the stack looks like when ChatClient::SendMsg is called:
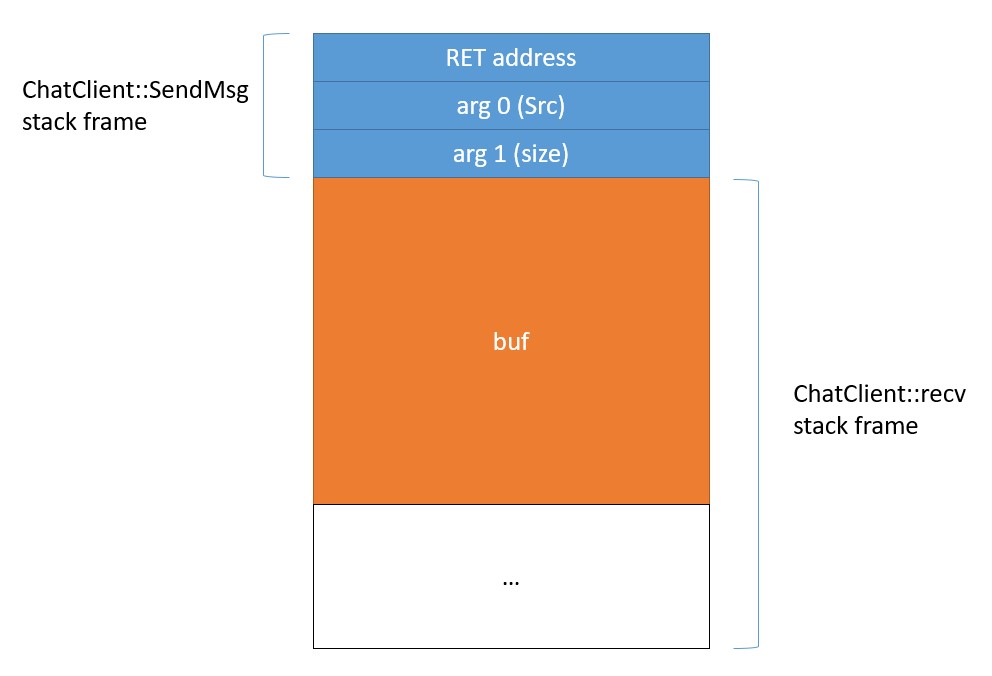
buf is the local variable of ChatClient::recv that stores the data received from the client. It contains
- Command (8 bytes)
- Data size (4 bytes)
- Data
This means that the shellcode we pass via SENDMSG is located at an offset of 0x18 from the top of the stack when ChatClient::SendMsg is called. With a gadget of the form
add esp, X; ret
where X >= 0x18, we obtain the control of the execution flow with a completely arbitrary stack frame. ucrtbase.dll has many of these gadgets, so we use one with X = 0x18. To start our exploit we use the same technique of Flag 3, but this time we replace the vtable entry of ChatClient::SendMsg with the address of the gadget.
But how do we find the gadget in memory? We want to play hardcore so let us assume we do not know any DLL version, so we cannot use hardcoded offsets. First, we need to find where ucrtbase.dll is mapped. userafterfree.exe imports many functions from it, for example free (RVA 0x50B8). We read the value of the import table entry and then read backwards until we find the “MZ” of the DOS header, marking the beginning of the DLL. From there, we skip the first 0x1000 bytes to reach the code section and then we simply read chunks of memory until we find the gadget "\x83\xc4\x18\xc3".
ROP
The next step is to create a ROP chain to make the memory executable using VirtualProtect. It will look like this:
- Address of VirtualProtect
- Address of shellcode (RET address of VirtualProtect)
- Page address of shellcode
- 0x1000 (size of page)
- PAGE_EXECUTE_READWRITE
- Address to store old protection (must be valid)
This is followed by the reverse shell shellcode. There is one problem, though. Because of ASLR, we do not know the address of the shellcode in the stack. On the other hand, we can read the value of ClientName of any the client and use that as a staging shellcode.
Once again we need to find the address of VirtualProtect. We can use a similar approach as for the gadget, but this time we need to manually to parse the export table of kernel32.dll.
Staging shellcode
After VirtualProtect is completed, the execution goes to the staging shellcode. At this point esp points to the address after the ROP, so we can use it to know where our final shellcode is located. The staging shellcode simply retrieves the address of the reverse shell shellcode from esp, calls VirtualProtect to make it executable and finally jumps to it.
mov edi, esp ; pointer to reverse shell shellcode
mov ebx, esp
shr ebx, 0xc
shl ebx, 0xc
push XXXXXXXX ; pointer to old protect
push 0x40
push 0x1000
push ebx
mov ebp, YYYYYYYY ; VirtualProtect
call ebp
jmp edi
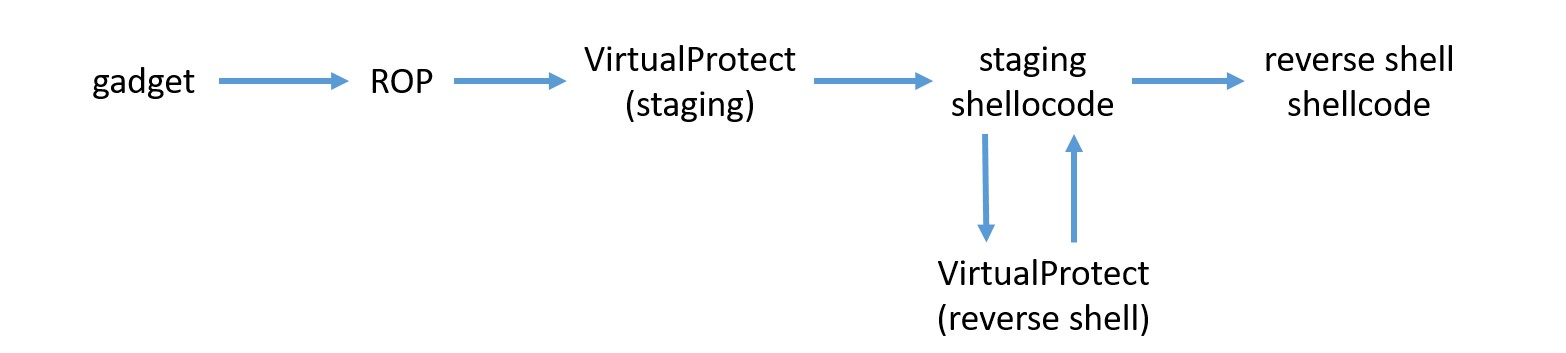
Exploit overview
Bonus point: support for Windows 10
If we try the exploit on Windows 10 it will not work right away. This is due to two differences regarding the LFH.
The first one is bucket activation: each bucket of the LFH is activated only after a certain amount of allocation of the given size; before activation, the backend allocator (i.e. standard one) serves the chunks. This problem is solved by creating some throwaway clients at the beginning. From my tests, after the creation of 4 clients, the next end up in the LFH.
The second issue is that on Windows 10, to make exploitation harder, the chunks of the LFH are selected in random order rather than sequentially. This means that we cannot be sure that the puppet is allocated in the chunk pointed by the ClientName of the controller. To beat this security measure we can create new clients until one ends up in the desired chunk. To verify that a client is in the chunk pointed by the controller we use GETNAME for the controller and verify that the first 4 bytes contain the address of the ChatClient vtable, which will always end with 0x81C even with ASLR.
Final result
Check out the final Python3 script here.