
Getting your hands on the "micro kernel" of NotPetya
As everyone in the infosec community, I wanted to get my hands on the latest malware case, the infamous NotPetya, EternalPetya, WhateveryouwantPetya. Let me start with a disclamer: I am completely out the naming debate, but for the sake of my mental health I will call it NotPetya from now on. There are already a lot of in-depth technical analysis of this malware, so I do not want to waste time writing down things that you can find elsewhere. As an example I’ll leave here the links to a couple of interesting reads on the topic:
- by hasherezade, analysis of the previous variants of Petya
- again by hasherezade, comparison between this variant and the previous
- by hacks4pancakes, considerations on the general lack of security in network architectures
As you probably know, NotPetya is composed of two stages. The first one encrypts a small set of file extensions, tries to infect other machines in the local network and prepares the second stage overwriting the MBR of the disk. This second component, which consists of a sort of micro kernel, is executed after reboot and it encrypts the MFT.
As we can read in the analysis linked above, getting the code of the second stage is fairly easy because the author did not even try to make reversing a bit hard. Therefore we can simply find the point at which the first stage is about to write the second one on the disk, set a breakpoint there in our favorite debugger and just dump it from memory.
But what if there was actually some effort towards complicating the life of malware analysts? In that case, it would be much easier to let the first stage do its nasty work and then retrieve the second stage from the disk. What I had in my hands was just a VDI file, the VirtualBox disk image format. While this is probably obvious for experienced analysts, it definitely wasn’t for me, so I would like to share the steps I did to obtain the code, hoping that it will be helpful for other newbie reversers like myself.
Get the disk image ready
If you take a look at the content of a VM directory, you will find something like this
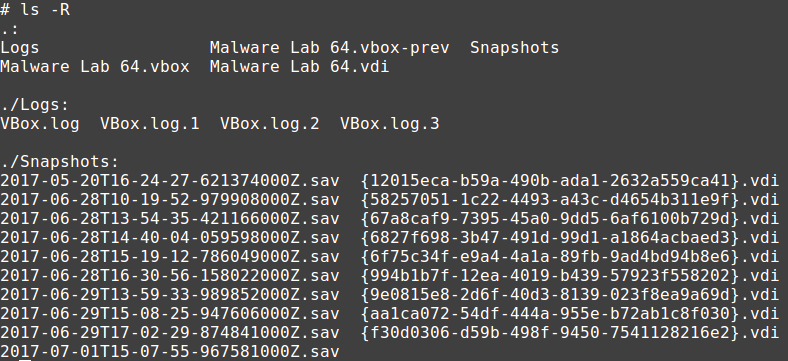
VirtualBox builds the images incrementally: the first time you create a new VM, a new VDI file is created an every change is written on it until you create the first snapshot; from that point on the changes will go in a new VDI file related to that snapshot. This process is repeated for each new snapshot, allowing the user to make a tree structure of VM states as he likes.
Unfortunately this mechanism goes against my goal, as for the analysis I need all the states consolidated in a unique VDI file. The way I found to get there with the least effort was to set my VM to the “post infection” snapshot and then clone it, making sure to use the full clone and the Current machine state options. The new clone has a single VDI image at the desired state.
Access the disk image
For this step the almighty qemu came to help. The virtualization version of the swiss army knife, qemu couldn’t lack the support to the VDI format. Assuming that we already have qemu installed, here is how to get from the disk file to an accessible device:
modprobe nbd
qemu-nbd -c /dev/nbd0 path_to_vdi_file.vdi
At this point our VDI file can be accessed through the device /dev/nbd0:

Note the 512-byte size of the sectors.
To remove the device we can use
qemu-nbd -d /dev/nbd0
MBR analysis
By default, the MBR is located in the first sector of the disk. To read the device I used the dd command
dd if=/dev/nbd0 of=mbr.bin bs=512 count=1
Which reads: from the file /dev/nbd0 to the file mbr.bin, read one block of 512 bytes (remember the sector size form fdisk?). To confirm that it actually is the MBR, the last two bytes should contain the signature 0xaa 0x55:

Got that right! I then loaded the binary dump in IDA
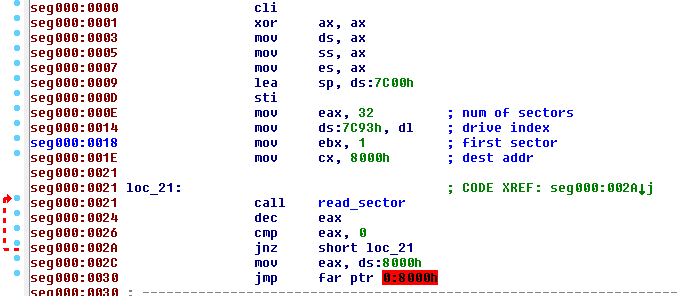
Basically what this code does is to read 32 sectors, starting from the second one (sector number 1), load it at the address 0:0x8000 and finally jump to it. This layout is identical in the previous Petya version, Goldeneye, as shown by hasherezade.
As there wasn’t much else to see here I moved to the newly loaded code.
The “micro kernel”
As the MBR showed, the kernel code resides in 32 sectors, from 1 to 32, so I went back to dd to dump it:
dd if=/dev/nbd0 of=kernel.bin bs=512 count=32 skip=1
And once again I switched to IDA to take a look at the code.
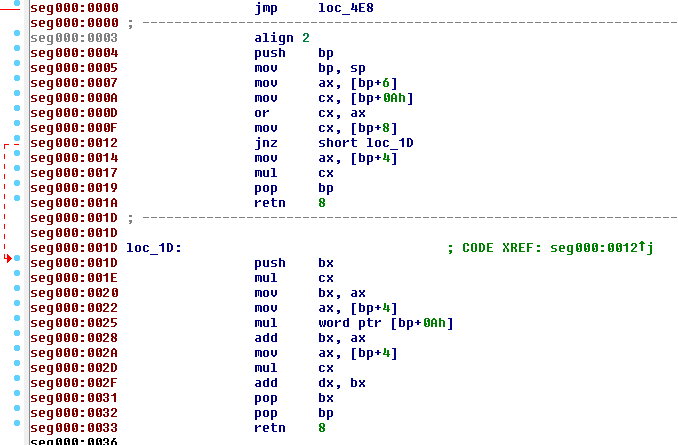
At this point I had reached my goal, but there was still a small fix to make. Lets take a look at this example:

The function print_string_video takes as the only parameter the address of the zero-terminated string to print. In this case the address is 0x9CA6, which is definitely beyond the memory region we are considering, which has a size of 512 * 32 = 16384 = 0x4000 bytes. So how can that reference be correct? Well, rembember that the MBR loads this second part at the offset 0x8000, therefore all the hardcoded absolute addresses in it take into account that offset.
The solution to this little problem is to rebase the code to the same offset 0x8000 within IDA. This allows to correctly view all the references.


Final thoughts
While this effort could seem a bit pointless, considering how easy it was to get the code directly from the first stage of NotPetya, I am quite happy with it for a number of reasons: I refreshed my knowledge of the boot procedures and of code before any OS/API is available, when you have to work with just bare interrupts; I am pretty sure this newly acquired methodology will be useful with future malwares that will work at boot level.
If some fellow reverser will find this useful for his/her research, then it will be the cherry on top!