Write-up: second Malwarebytes RE crackme
Here we go again with another crackme by hasherezade. I would like to stress the fact that it is a very good learning tool, because of its malware-like behavior and the many different features it has. Here is my write-up.
Preparation
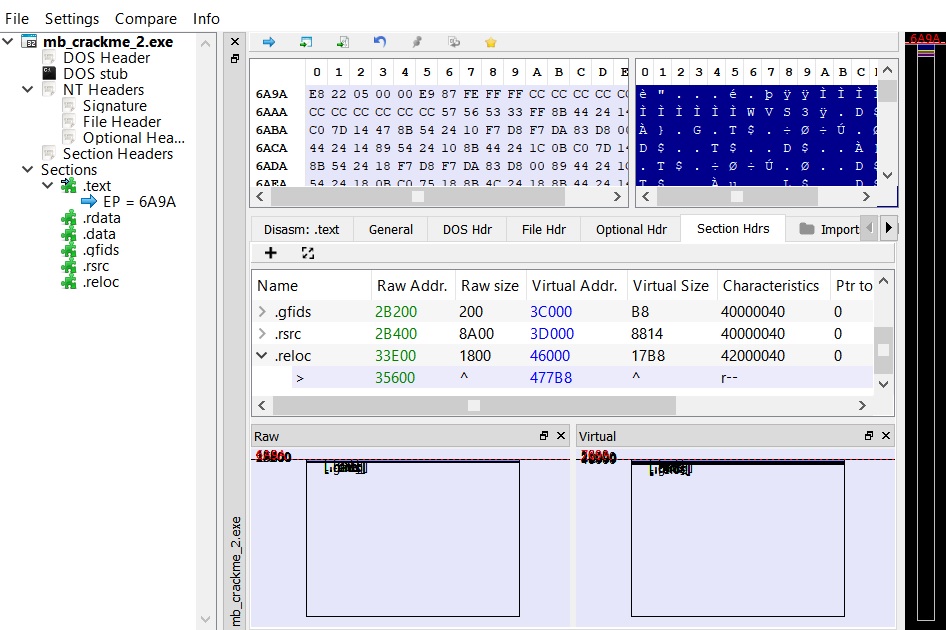
Just by downloading the executable we can see a peculiar thing: 8 MB for a commandline executable is quite a lot, meaning that it probably has something packed inside it. If we load it in a PE analyzer, we can see that the last section’s raw data ends at 0x35600 (218 KB), so the rest must be the packed data.
Continuing with standard static analysis, we can check the strings contained in it, and that is where we hit the jackpot. There are many strings starting with “Py” which definitely means we are dealing with some sort of Python wrapper. Specifically, the string “pyi-windows-manifest-filename” is an indicator of the PyInstaller wrapper. To extract the embedded Python code pyinstallerextractor is the way to go.
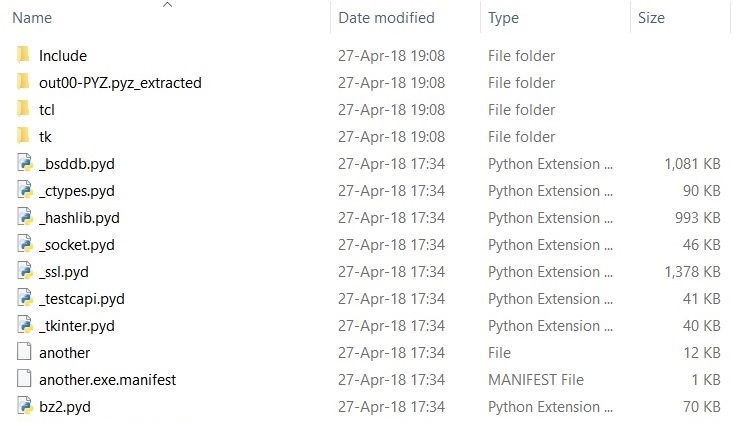
We have a folder filled with various DLLs and Python modules, which you may recognize, dependening on your familiarity with the language and its libraries. A file that seems unusual is called “another”. To decompile its bytecode and get the original source code we can use uncompyle6. We rename the file to “another.pyc” and run the tool, but we get the following error:
ImportError: Unknown magic number 99 in another.pyc
The header of the file is corrupted or is missing something. Once again our lord and savior Google helps us, here is a link to a writeup for a CTF with an explanation on how to fix the header and complete the decompilation.
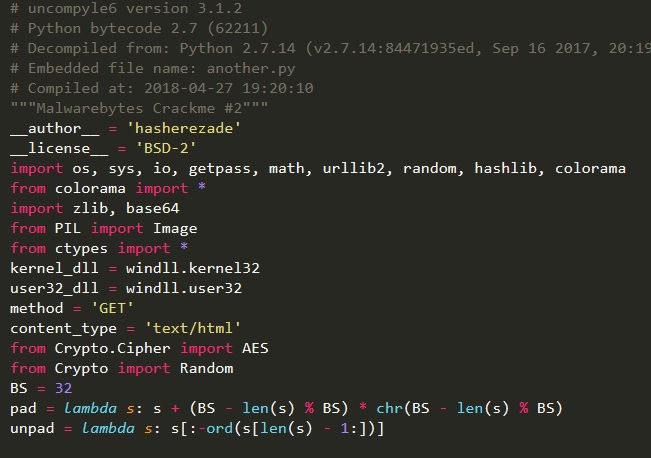
We finally have the Python source code:
Stage 1
We are working on the function stage1_login. Pretty straightforward: it checks for a username, password and numeric PIN. The username “hackerman” is hardcoded in the function check_login. For the password instead, the function check_password compares the MD5 of the inserted value against an hardcoded one. We can use any online MD5 database to reverse it, for example https://www.md5online.org. In this way we get the incredibly strong password “Password123”. Finally, for the PIN things become more interesting:
- function
get_url_key: seed the RNG algorithm of Python with the inserted number and generate a string of 32 digits - function
check_key: check the MD5 of the string against another hardcoded value
This time we are not as lucky, the MD5 is not present in any online database, so the only available approach is to bruteforce the PIN. This is actually a trivial task, since we have the whole source code we can just copy-paste get_url_key and check_key and test as many PINs as we like.
import random
import hashlib

def check_key(key):
    my_md5 = hashlib.md5(key).hexdigest()
    if my_md5 == 'fb4b322c518e9f6a52af906e32aee955':
        return True
    return False

def get_url_key(my_seed):
    random.seed(my_seed)
    key = ''
    for i in xrange(0, 32):
        id = random.randint(0, 9)
        key += str(id)
    return key

for i in range(1000000):
    if check_key(get_url_key(i)):
        print "Found: " + str(i)
        exit()
hasherezade was nice to us and chose a small PIN value, so we get it almost instantly: 9667. When we input the 3 correct values, decode_and_fetch_url is called, which uses the generated key to decrypt a buffer and obtain a URL (https://i.imgur.com/dTHXed7.png) and fetch its content. At this point Stage 1 extracts the DLL embedded in the image and puts it in a RWX memory region before starting the execution from offset 2. At that location we find position-independent code that performs the complete loading procedure: allocation of sections, imports retrieval, relocation. Finally it calls the entrypoint, i.e. the DLLMain.
Stage 2
Since we retrieved the DLL we may be tempted to run it by itself (via rundll32), but an anti-analysis technique is in place to prevent it. This technique is interesting and (at least for me) unusual, so I decided to dedicate a separate paragraph to it (at the end of the write-up). Since it is not strictly necessary to complete the challenge you can skip it, TLDR: the DLL does its job only if it finds a loaded module named “python27.dll”.
The real fun begins at sub_100010D0, which creates a new thread running the routine sub_10001110. Here the thread calls EnumWindows every second, to enumerate all top-level windows and, for each of them, execute the callback sub_10005750.
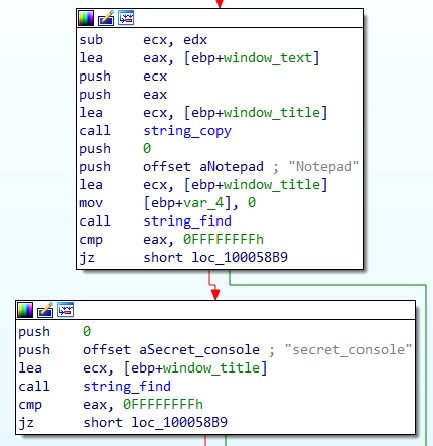
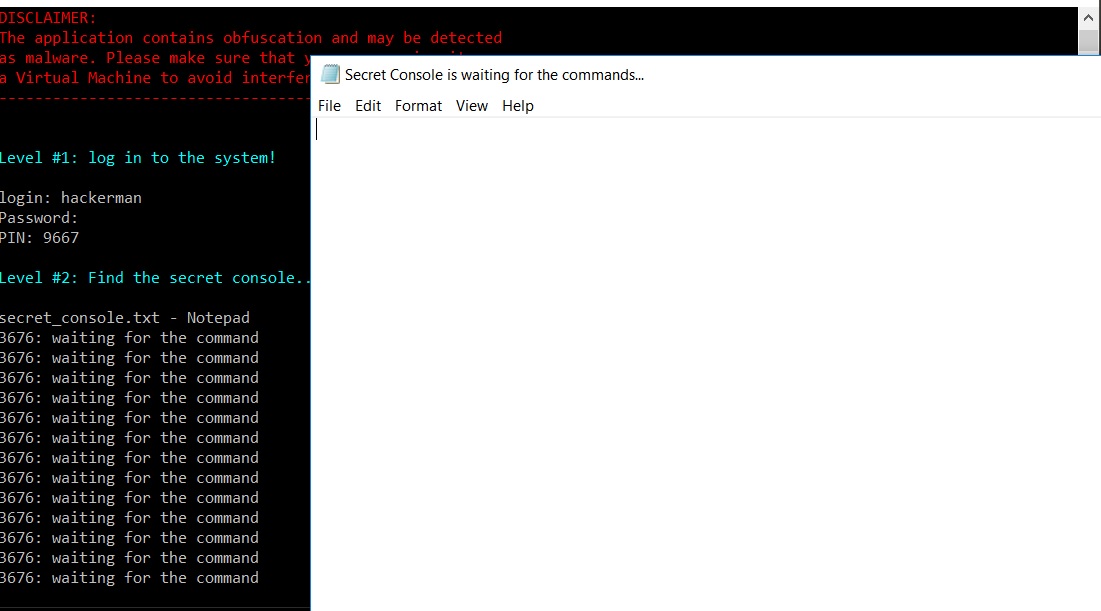
The callback retrieves the title of the window (via SendMessageA with WM_GETTEXT) and checks whether it contains the strings “Notepad” and “secret_console”. So our secret console is a file with a name that contains “secret_console” (e.g. secret_console.txt) opened with Notepad. After opening that file we see that the title of the window is changed to “Secret Console is waiting for the commands…“.
What commands should we insert? Back to IDA.
After asserting that the window is the right one, the callback calls EnumChildWindows, with sub_100034C0 as the callback. This new callback is almost identical to the previous one, in that it calls SendMessageA with M_GETTEXT, but this time it looks for the string “dump_the_key”. To proceed we can simply type that string in the body of the editor, and voilà!
Stage 3
We are now back to the commandline, where the program asks us for a RGB color combination. In order to proceed we have to understand what happened after we inserted the command in the secret console of Stage 2. After the command is verified, the EnumChildWindows callback performs the following actions:
- load the library “actxprxy.dll”
- from the address where it was loaded, change the memory protection of 0x1000 bytes to read-write
- copy there 617 bytes (the “dumped key”)
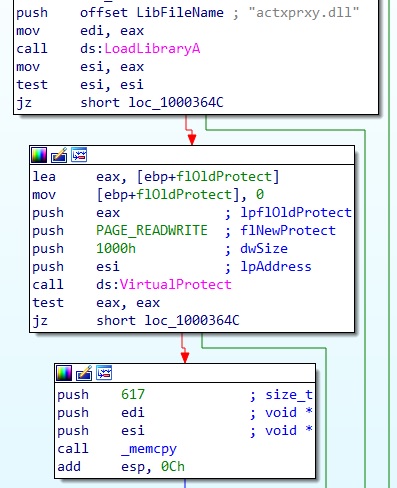
To get the dumped data, we can attach any debugger to the process and go where actxprxy.dll was originally loaded.
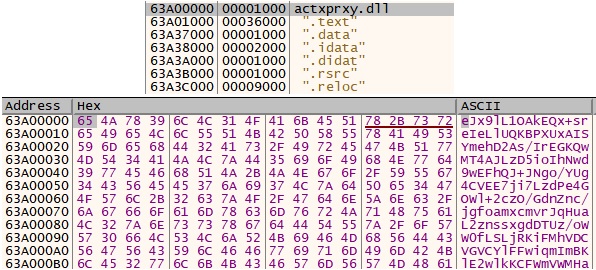
It is clearly a Base64 encoded buffer.
At this point we can look at the receiving end in the main Python script, function decode_pasted:
- read the data
- Base64 decode it
- decompress it with zlib
- create a key by concatenation of the 3 RGB bytes
- XOR-decrypt the decompressed data with the key
- try to run it with
exec
Our last challenge is to bruteforce the 3 values of the key. According to the specification of exec, it can receive either a string of commands, a code object or a file object. Since the decrypted buffer is directly passed to exec, we are in the first case. This information allows us to do a lot of pruining for the bruteforce, instead of testing the whole 256*256*256 key-space, which would take a fair amount of time. For a 3-byte-key XOR encryption we have that:
key = R G B
decrypted[3*i] = R ^ encrypted[3*i]
decrypted[3*i+1] = G ^ encrypted[3*i+1]
decrypted[3*i+2] = B ^ encrypted[3*i+2]
Knowing that the result is a string, we can deduce that R is such that
R ^ encrypted[3*i] is a printable character for all i. Same goes for G, B. By enforcing this property, we reduce the set of possible R, G, B; the number of required tests becomes 256+256+256 plus the possible combinations, which should not be many.
Here is a Python script to do it:
import base64
import zlib
import string

def get_printable(str, offset):
    res = list()
    for i in range(255):
        char = chr(ord(str[offset]) ^ i)
        offset2 = offset
        while char in string.printable and offset2 < len(str):
            char = chr(ord(str[offset2]) ^ i)
            offset2 += 3
        if offset2 >= len(str):
            res.append(i)
    return res

str = "eJx9lL1OAkEQx+sreIeLlUQKBPXUxAISYmehD2As/IrEGKQwMT4AJLzD5ioIhNwd9wEFhQJ+JNgo/YUg4CVEE7ji7LzdPe4GOWl+2czO/GdnZnc/jgfoamxcmvrJqHuaL2znssxgdDTUz/oWW0fLSLjRKiFMhVDCVGVCYlFFwiqmImBKlE2wlkKCFWmVWMHaoFQIZcAaYRUzImBy1NLwyNEo1VPgJLIWCSte7EwWSgkoV0AUzCj/tXPaXBTNq5YY98yKl905D/URQKwGPFVwThHrOGta1yPYBcozFWmgY9P+MG5eGfjX5tSqng+1Rx9At1tEh3ag+W/trF/tcKZ2FON7fnFuaqBXnODZ3Ykw0+xOVG2uhwvrolXYPl5/wD3haosUfO8DM9sTR0EEU274VOFOlvbBtoctdb2EwpYWwVRXMaUwsUSJhSNMEG4RbmIqa8QzggqBbAa/WX2SHqMdxC/hl/udQgZrfLHTJ4yfc2aQ7A4PJ2YK1dneZypvBFGROlybY1vk/MtI57Ea+QfyB+ZPsl+Ov73sPnfYIop3exfl19hTa69zjwN5rHbLI3vLzb6C+DvephO733pPdPRYux3MZeHfEsj+AqgYif8="

val_arr = zlib.decompress(base64.b64decode(str))
good_rs = get_printable(val_arr, 0)
good_gs = get_printable(val_arr, 1)
good_bs = get_printable(val_arr, 2)
The result is that we have 2 possible values of R (128, 131) and only one for G (0) and B (128). We can now test the 2 available combination and verify that the correct key is
R = 128, G = 0, B = 128:

Anti-analysis - Stage 2
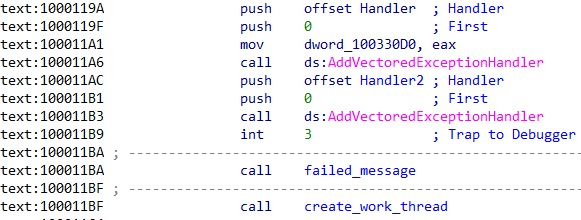
This technique is based on exception handlers, which is not really a novelty per-se. What is really interesting is how they are used to change the execution path. From address 0x1000119A we find two calls to AddVectoredExceptionHandler, adding the two handlers Handler1 (0x10001260) and Handler2 (0x100011D0). Next, it causes an exception with the instruction int 3 (breakpoint interrupt). In a normal execution, i.e. without a debugger, the two user-defined handlers are called. Before continuining with the analysis, a simple notion regarding the handler is needed: each handler receives as parameter a EXCEPTION_POINTERS structure , which contains a pointer to a CONTEXT structure (offset 0x4). Inside this structure there are several pieces of information regarding the state of the processor at the time of the exception, such as register values. Among the others there is the value of EIP (offset 0xB8) pointing at the instruction that caused the exception. When the last handler terminates, the normal execution of the program continues from the value of EIP stored in the CONTEXT structure.
Now back to our case. Handler1 creates a new environment variable named “mb_chall” and, if a module named “python27.dll” is present in memory, it writes the current PID to the variable. Handler2 retrieves the same environment variable and compares its content with the current PID. If they are different, the EIP in the CONTEXT structure, is incremented by 1, becoming 0x100011BA, where we have a call to failed_message (0x100010F0). Instead if the two values match, EIP is incremented by 6, thus failed_message is skipped and instead create_work_thread (0x100010D0) is called, where the body of Stage 2 resides.